Avoiding Common Photo Rejection Reasons
In the world of digital photography, the difference between a good photo and a great one often lies in the details. Whether you’re a professional photographer, an aspiring Instagram influencer, or just someone who loves snapping photos of their daily life, avoiding common photo rejection reasons can help elevate your work. Picture this: you’ve captured a stunning moment, but when you try to upload it to a website, app, or social media platform, it gets rejected. What went wrong? Why was your photo rejected? And most importantly, how can you avoid these mistakes in the future?
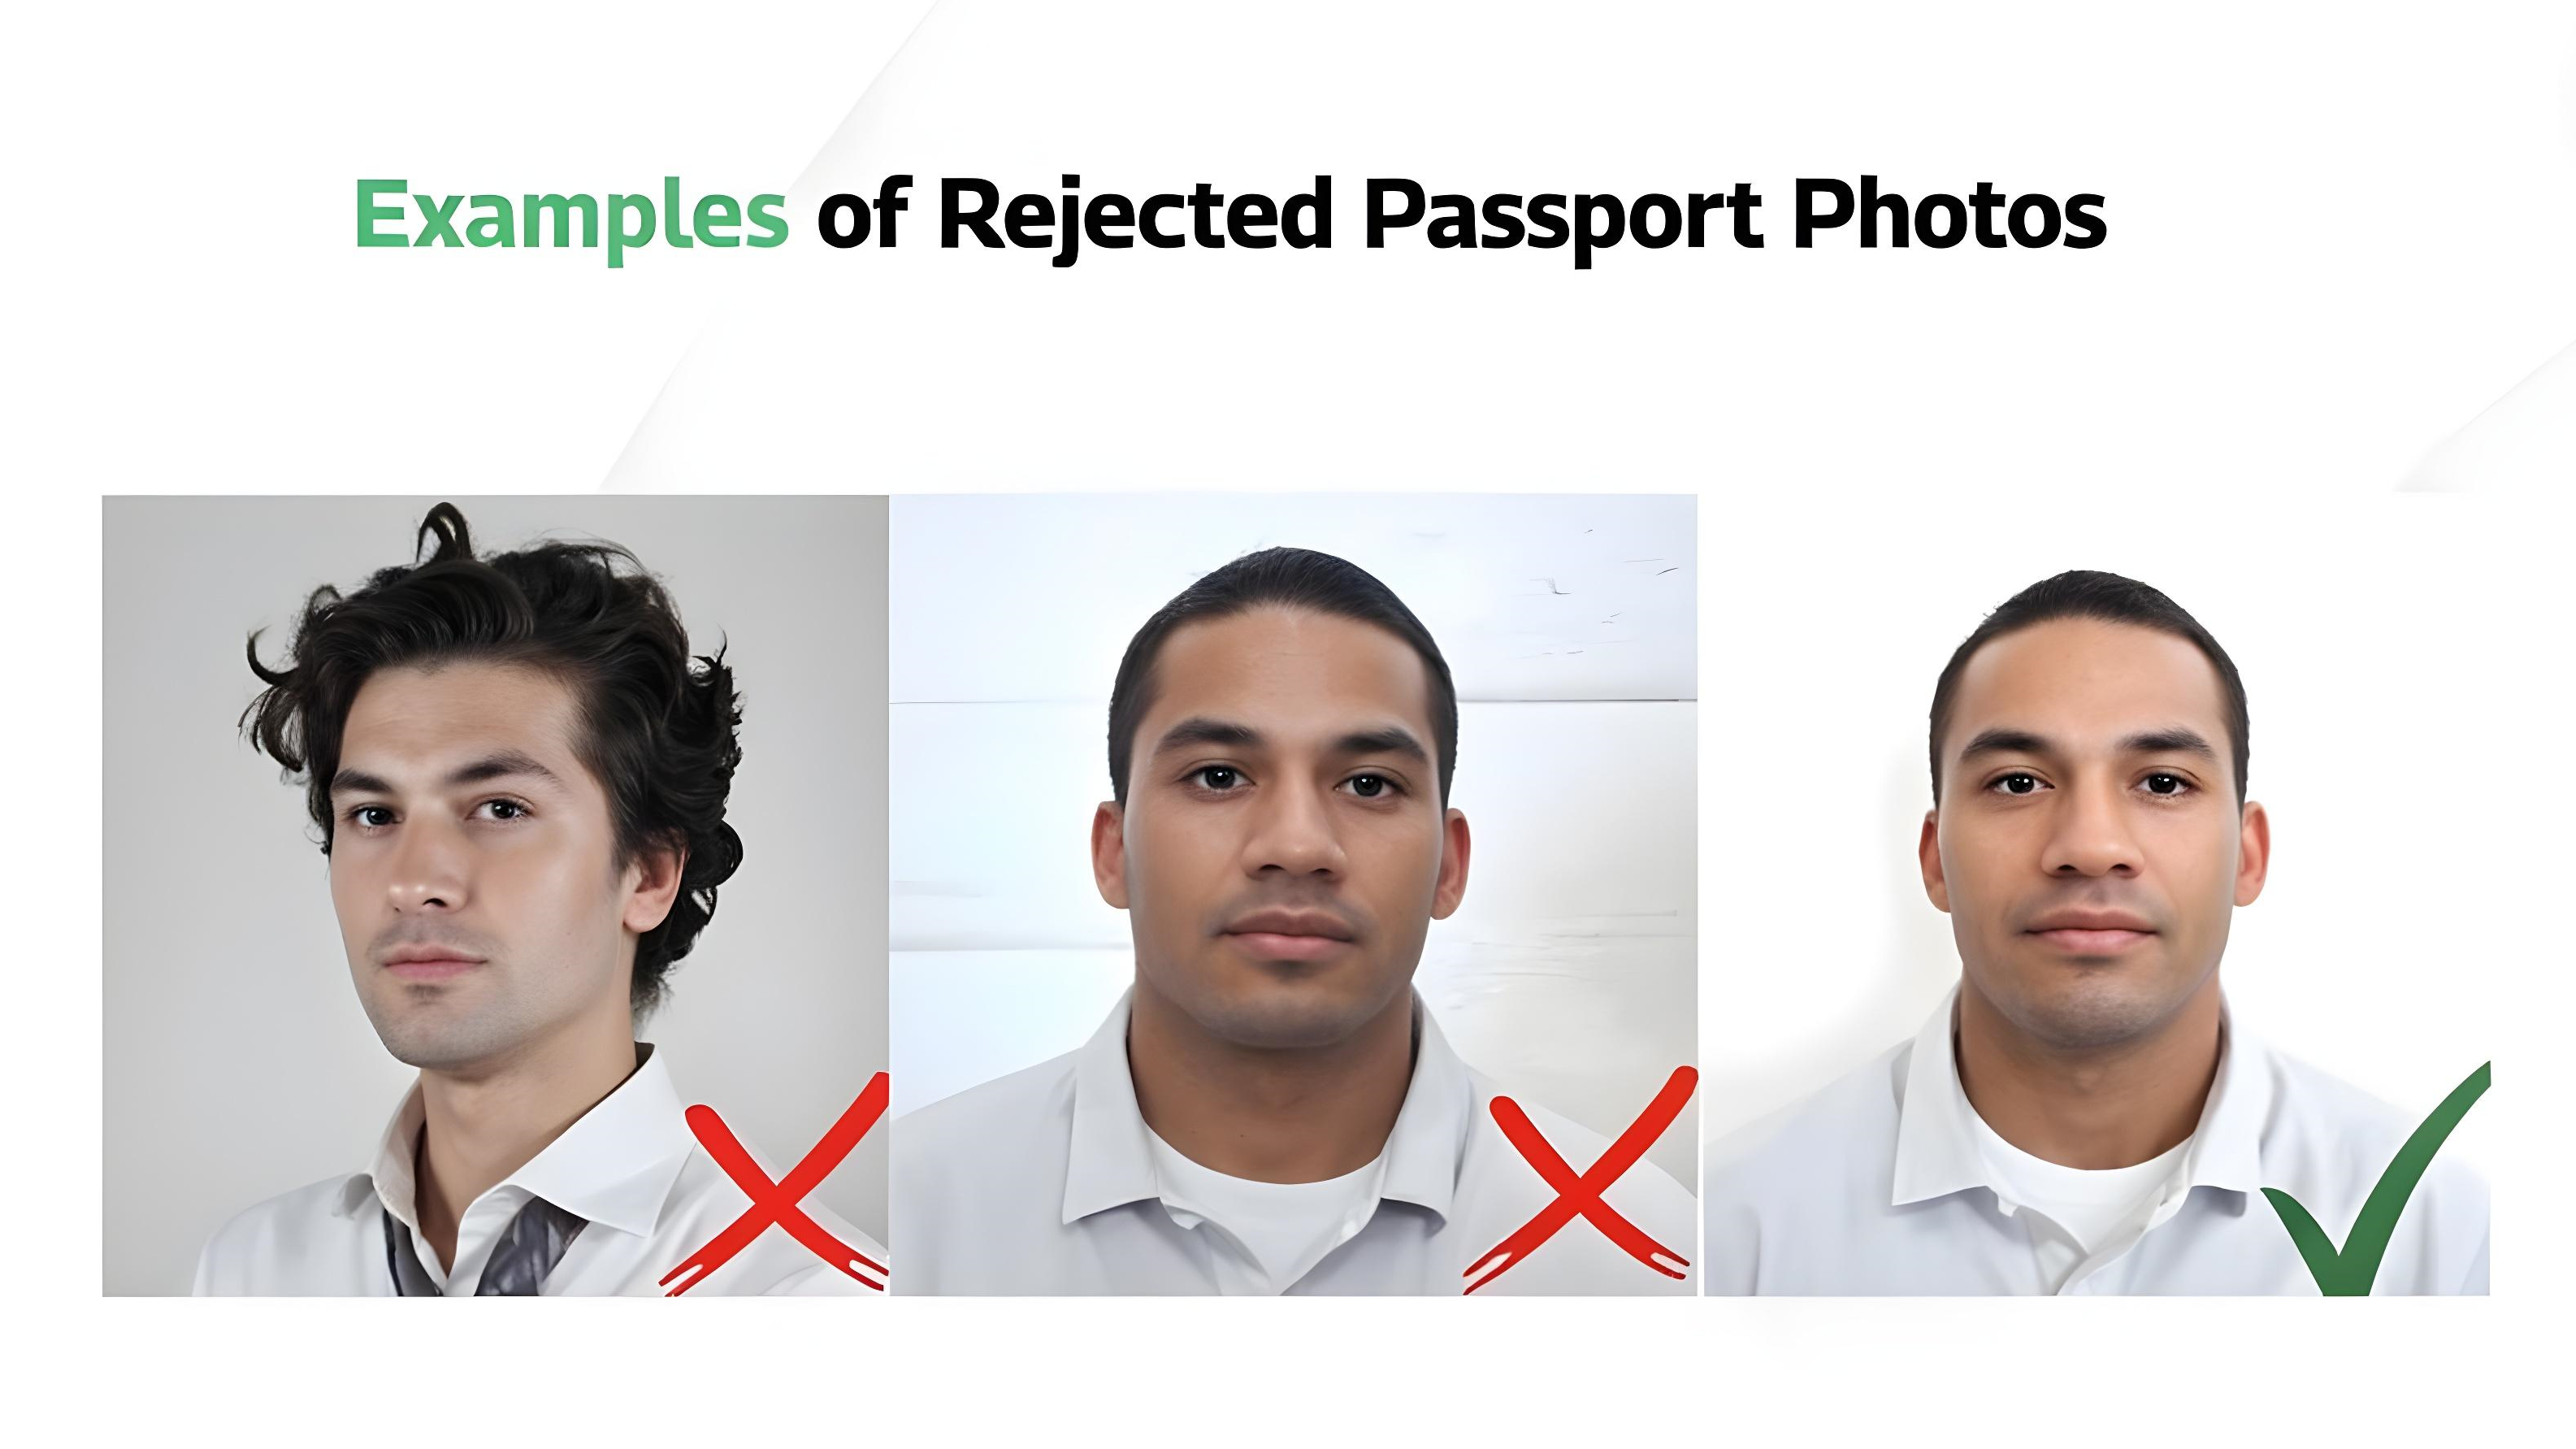
Understanding Photo Rejection
Photo rejection can be frustrating, especially when you’ve put effort into capturing what you thought was the perfect shot. But before getting discouraged, it’s important to understand what photo rejection really means. On most platforms—whether stock photo sites, social media networks, or online portfolios—rejection simply indicates that your photo didn’t align with their guidelines or standards. This doesn’t necessarily mean your image lacks value; it just might not be the right fit for that specific context.
Quality is one of the most common reasons images get rejected. Blurriness, poor lighting, low resolution, or visible noise can all be red flags for reviewers. These technical issues often happen during shooting or editing, but the good news is they’re usually preventable. Paying attention to sharpness, proper exposure, and correct file settings before uploading can significantly reduce the chances of rejection due to quality concerns.
Composition also plays a big role in whether your photo gets accepted. A photo with awkward framing, distracting backgrounds, or poor use of space may not communicate its intended message effectively. Reviewers look for images that are visually balanced, engaging, and focused. Practicing good composition techniques—like the rule of thirds, leading lines, and minimalism—can go a long way in improving your approval rate.
Lastly, relevance and adherence to platform-specific rules are critical. Even a technically flawless photo can be rejected if it’s not aligned with the platform’s content policy or target audience. For instance, a stock site might reject a beautiful image of a person if you didn’t include a model release form. Or, a site focused on editorial content may turn down overly commercial-looking shots. Always read the submission guidelines carefully before uploading—it could save you time and frustration.
Low Image Quality: The Importance of High Resolution
| Issue | Cause | Effect on Image | How to Prevent It | Platform Tips |
| Low Resolution | Using low camera settings or cropping too much | Blurry, pixelated images | Always shoot in high resolution, avoid excessive cropping | Check resolution requirements before uploading |
| Excessive Compression | Saving images in low-quality formats | Loss of detail, visible artifacts | Save as high-quality JPEG or PNG, avoid re-saving multiple times | Use uncompressed or minimally compressed formats |
| Poor Lighting | Shooting in dark or overexposed environments | Washed out or overly dark images | Use natural light or proper studio lighting | Adjust exposure and white balance in post carefully |
| Image Noise | High ISO or low-light shooting | Grainy texture, especially in dark areas | Use lower ISO settings, shoot in better lighting | Noise reduction tools can help—use them sparingly |
| Over-Editing | Heavy filters or adjustments | Unnatural look, detail loss | Edit with moderation, keep image looking realistic | Review platform editing standards before submission |
Poor Lighting: Don’t Let Darkness Kill Your Shot
Lighting isn’t just a technical aspect of photography—it’s the soul of your image. It defines the mood, brings out the subject, and adds depth. When lighting is bad, everything else falls apart, no matter how perfect your composition or resolution is. If your photo is too dark, too bright, or filled with harsh shadows, it’s probably headed straight for the rejection pile.
- Embrace Natural Light
Daylight is often the most flattering and easiest light source to work with. Open a window, head outside, or use shaded areas to get that even, soft glow that flatters subjects and enhances colors. - Avoid Direct Sunlight
Shooting at high noon under the full sun creates unwanted harsh shadows and can blow out highlights, especially on faces. Instead, aim to shoot during the golden hour—the first hour after sunrise or the last before sunset—when the light is warm, diffused, and naturally beautiful. - Diffuse the Light When Needed
If you’re working with strong light sources, try using diffusers like a sheer curtain, a softbox, or even a white sheet. This spreads the light evenly across your subject and prevents blown-out highlights or shadow patches. - Use Artificial Light Wisely
When shooting indoors, rely on ring lights, LED panels, or even well-placed household lamps. Make sure the light is positioned to illuminate the subject evenly, without casting deep shadows or creating unwanted glare. - Mind the Background Lighting
Avoid backlighting unless you’re intentionally going for a silhouette. If the background is too bright compared to the subject, the camera may expose for the wrong area, leaving your subject in darkness. - Check and Adjust Your White Balance
Poor lighting often leads to weird color casts—like yellowish tones indoors or blue-tinted shadows. Manually setting your white balance or correcting it in post can save an otherwise perfect shot. - Take Test Shots First
Before diving into your full shoot, snap a few test photos to assess lighting. Look at them on a larger screen if possible—not just your camera’s display. This helps you spot problems early and make adjustments.
Blurry Images: A Snap You Don’t Want to Keep
Blurry photos are one of the fastest ways to get your work rejected. Even if the composition is perfect and the lighting is spot-on, a lack of sharpness can completely ruin the shot. Most of the time, blurriness is caused by camera shake, poor focus, or subject movement. Unless you’re going for a creative motion blur on purpose, your image should always have a clear, defined focal point that stands out.
Many photographers underestimate the importance of stability. When you’re shooting in low light or using slower shutter speeds, even the slightest hand movement can blur the entire image. Holding your breath while taking the shot or using a tripod can make a huge difference in these situations. The goal is to eliminate any unintentional motion that could ruin the clarity.
Focusing is another common culprit. Cameras, especially smartphones, don’t always focus where you want them to. It’s crucial to check that the focus is locked on the subject—not the background or something irrelevant. Manual focus can help in tricky situations, especially when dealing with close-ups or complex scenes.
Fast-moving subjects present their own challenge. If you’re trying to capture someone running, a flying bird, or a car in motion, you need a fast shutter speed to freeze that action. Otherwise, you’ll end up with a smeared or ghosted image that lacks detail. Good sharpness tells the viewer exactly where to look—and if that’s missing, the photo loses its impact.
Wrong Aspect Ratio: Size Does Matter
| Platform/Use Case | Preferred Aspect Ratio | Common Mistake | Why It Matters | How to Fix It |
| Instagram Feed | 1:1 (Square) or 4:5 | Uploading 16:9 wide | Photo gets cropped, losing key content | Crop to square/portrait before uploading |
| Instagram Stories | 9:16 (Vertical) | Using landscape shots | Awkward black bars or zoom-in | Use vertical framing when shooting |
| Website Banners | 16:9 (Landscape) | Uploading square images | Doesn’t fill space properly | Resize/crop using photo editors |
| Stock Photo Websites | 3:2 or 4:3 (Varies) | Unconventional sizes | Rejection for format inconsistency | Check site-specific guidelines beforehand |
| YouTube Thumbnails | 16:9 | Uploading square/cropped images | Thumbnail looks stretched or misaligned | Edit your image to match thumbnail specs |
Over-Editing: Keep It Natural
Let’s be real—editing is fun. Adding a pop of color, sharpening the details, or softening the background can take a good photo and make it great. But when you push it too far, you risk losing the authenticity that makes the image appealing in the first place. Platforms and audiences alike prefer natural-looking images over ones that scream “Photoshop.” If your photo looks too perfect, it might just end up being rejected.
- Stick to minimal adjustments. Think of editing as seasoning food—you want just enough to enhance the flavor, not overwhelm it.
- Use filters sparingly. One quick way to ruin a shot is slapping on a filter that distorts colors or adds unrealistic lighting.
- Watch the saturation levels. Oversaturated images can look cartoonish. Aim for rich but realistic tones that stay true to what your eye actually saw.
- Keep skin tones natural. This is especially important for portraits. Over-smoothing or altering skin color can make people look waxy or alien.
- Balance highlights and shadows. Over-editing these can crush detail or blow out parts of your image, making it look flat or fake.
- Zoom in to check your edits. Sometimes things look great at first glance, but a closer look reveals halos, pixelation, or color bleeding from over-processing.
- Compare before and after. Always keep a copy of the original image to compare your edits and make sure you haven’t gone too far.
- Avoid HDR overload. High dynamic range can be beautiful—but if it’s overdone, your photo might end up looking more like a video game than reality.
- Stay true to the subject. If your editing changes the emotion, message, or essence of the image, dial it back.
Composition Mistakes: The Rule of Thirds Can Save Your Shot
Composition is one of those things that separates a snapshot from a photograph. Even if your lighting is perfect and your subject is interesting, a poorly composed shot can still get the axe during the review process. It’s not just about what you photograph—it’s about how you frame it. Composition gives your photo balance, flow, and purpose. Without it, even the most technically flawless image can fall flat.
One of the easiest and most effective composition techniques is the rule of thirds. Picture a tic-tac-toe grid placed over your image—three rows, three columns. The magic happens where those lines intersect. Placing your subject at or near these intersections creates a more dynamic and pleasing shot. It’s a simple trick, but it dramatically improves how people perceive your photo.
Another key to strong composition is avoiding clutter. Too many elements in one frame can overwhelm the viewer and dilute your subject. Think of it like storytelling—every part of the photo should support the main message. You want to guide the viewer’s eye naturally, not make them feel lost. That’s where things like leading lines come in—paths, fences, shadows—they pull the eye straight to your subject without even realizing it.
Also, try not to always center your subject unless it’s a stylistic choice or the symmetry calls for it. Centering can feel stiff or uninteresting in certain shots. As you get more comfortable with composition, you’ll start recognizing when it works and when it doesn’t. Like any art form, photography is about intuition—but knowing the rules first gives you the power to break them intentionally later.
Incorrect File Format: Save in the Right Format
| Issue | Cause | Impact | Platform Preference | How to Fix It |
| Wrong File Type | Image saved as TIFF, RAW, BMP, etc. | Upload rejection or failure to display properly | JPEG, PNG | Export image in JPEG or PNG format before uploading |
| Unsupported File Extension | File not recognized by the platform | Upload error or format incompatibility | JPEG (.jpg), PNG (.png) | Rename or re-export using proper extension |
| File Too Large | TIFF or RAW formats are uncompressed | Slower upload, site lag, or complete rejection | Compressed formats preferred | Compress image without compromising quality |
| Loss of Quality on Convert | Poor conversion methods | Blurry or distorted image after conversion | High-quality compression | Use trusted tools like Photoshop or online converters |
| Platform-Specific Format | Custom or proprietary formats | Not accepted universally | JPEG for general use | Double-check platform guidelines before uploading |
Unwanted Objects: Clear the Clutter
- Always scan your frame before taking the shot to spot any distracting elements like trash bins, wires, or random people in the background.
- Choose locations with minimal visual noise to help keep the focus on your subject and make your composition cleaner.
- Pay attention to reflective surfaces like mirrors or windows that might capture things you didn’t intend to include.
- Use portrait mode or adjust your aperture to blur out busy backgrounds and highlight the subject clearly.
- Don’t be afraid to move your subject or change your angle if something distracting is in the way—sometimes a small shift makes a big difference.